ホーム » コンピュータ (ページ 4)
「コンピュータ」カテゴリーアーカイブ
最近の投稿
- switchbot の munin プラグインを multigraph 化2026-10-23自宅内を switchbot で色々と管理できるようになったけど、温湿度測定の対象も増えてきたら、munin […]
 php2shell の対応2026-10-22PHPの更新が前日に予告され、一斉更新がかかるという流れは、かなり重大。 […]
- Ubuntu 26.10 への更新(mariadbトラブル)2026-10-15Ubuntu 26.10 の公開に合わせて、自宅サーバの do-release-upgrade -d […]
- 蝗はイナゴ?バッタ?2026-10-11
- 外部からの到達確認2026-10-03外部からの HTTPS トラブルもあり、nagios に外部から自宅サーバへの到達性チェックを追加。 […]
HomebridgeからHomeAssistantへ
Docker 上の HomeAssistant の整備もすすみ、在宅/外出の tracker も安定運用できるようになった。
Homebridge を停止
一方で、Homebridge の方は、Homebridge 2.0 が出てきたけど、自作のscriptと連動するための homebridge-cmdswich とかが、2.0 でサポート対象外となってきて、自宅で活用していたものが使えなくなった。しかし、google home からの操作は Switchbot に移行できたし、ブラウザからの操作なども HomeAssistant で可能になり、”Hey Siri” が使えなくなるくらい。Siri は使ってないし。ということで Homebridge の起動を停止とした。
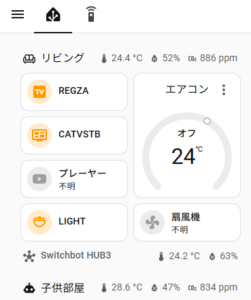
気温でエアコン起動
気温が一定温度を越えたときに、エアコンで冷房を起動する処理は、nagios4 の異常温度警告で起動する shell script からエアコンを動かしていた。しかし、HomeAssistant のオートメーションを使えば、設定を UI で気軽に障れるので、移行。
HomeAssistant のオートメーション
スマホの Ping(ICMP) の binary_sensor では、スマホがスリープ状態になったりするタイミングがあって、単純な ping では接続/切断が発生して、在宅/外出が正しく検出できない。
Ping(ICMP)の設定には consider_home で『デバイスが応答しなくなってから「切断」と判定するまでの待ち時間』を設定することができるが、エンティティとして扱える binary_sensor には consider_home は効き目がない。調べる中で device_tracker を有効にする必要があることが分かったけど、有効設定の画面にたどり着くのにひと手間かかった。
ようやく、device_tracker が使えるようになり、在宅/外出の判定がうまくできるようになり、オートメーションの設定。
Gemini が automation.yaml で設定する方法を解説してくれたけど、自分が在宅しているかどうかで色々と通知を切り分けたかったので、オートメーションの UI での登録はちょい悩んだけど…
オートメーションの例
UIで設定した結果を、YAML形式で表示
# shell_command.sh_mail_notify_message   - メールで送る shell_command
# shell_command.sh_google_notify_message - Google Home で話させる shell_command
alias: とーるの帰宅/外出を通知
description: ""
triggers:
  - trigger: state
    entity_id:
      - device_tracker.iphone_xxxx
conditions: []
actions:
  - action: shell_command.sh_mail_notify_message
    metadata: {}
    data:
      to: t-saitoh
      message: >-
        とーるが
        {% if states('device_tracker.iphone_xxxx') == 'home' %}
        帰宅/{{ now().strftime('%H:%M') }}
        {% else  %}
        外出{{ (now() - timedelta(seconds=450)).strftime('%H:%M') }}
        {% endif %}
  - if:
      - condition: state
        entity_id: device_tracker.iphone_yyyy
        state:
          - home
    then:
      - action: shell_command.sh_google_notify_message
        metadata: {}
        data:
          message: >-
            とーるが
            {% if states('device_tracker.iphone_xxxx') == 'home' %}
            帰宅
            {% else %}
            外出
            {% endif %}
            しました
mode: single
バイブコーディングによる越前焼の試作システム
ジュニアドクターにて越前焼の試作システムを作りたい
ジュニアドクター(2025)にて指導している中学生の生徒さんから「越前焼の試作システム」を作りたいといった要望があり、Google Gemini を使ったバイブコーディングによりシステムを作ってもらった。
最初に基礎的なJavaScriptの説明を行った後、THREE.js だと3次元表示を簡単に作れる…といったことが分かったので、プロンプトに与える内容などの経過を見せながら、システムを作っていってもらった。
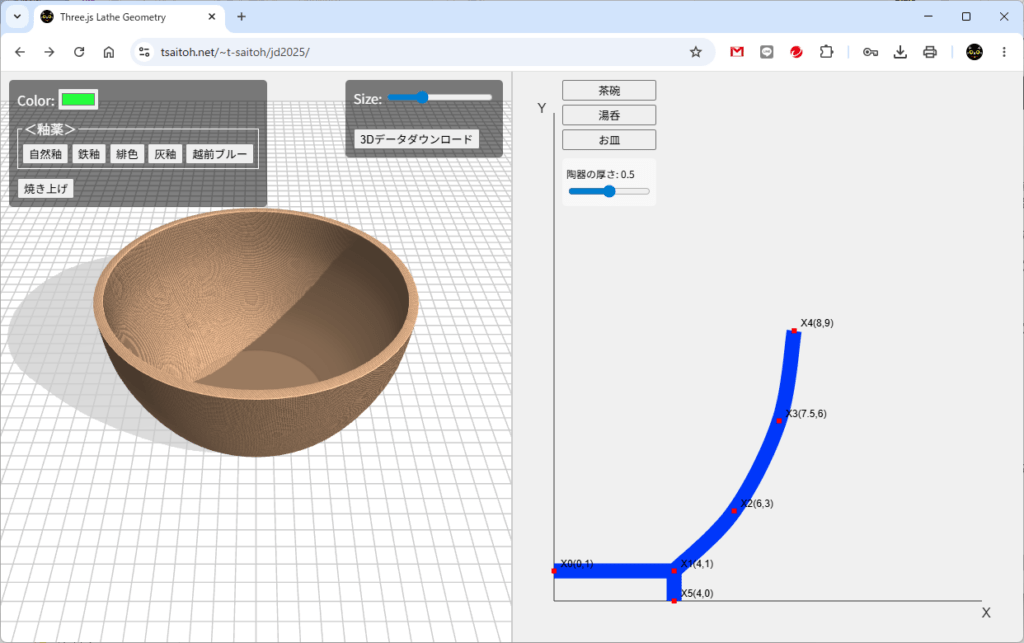
今回 改めて、バイブコーディングの説明のために、システム構築までのプロンプトを再現してみた。
THREE.js を用いた立体表示
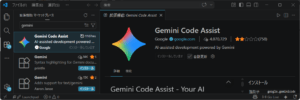
VSCode に、Gemini Code Assist などをインストールした環境でプログラムを作成する環境を構築。
- JavaScript と THREE.js を用いて、立方体を表示する index.html を作って。
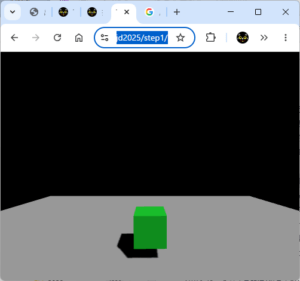
- 立方体を表示する index.html ファイルを作成しました。このファイルをウェブブラウザで開くと、緑色の立方体が回転しているのが確認できます。
- 立方体の影が解るように、照明を追加して。
- index.html ファイルが照明と影を含むように更新されました。以下の変更を加えました:
1. レンダラー: 影マッピングを有効にし、より柔らかい影のために影マップタイプを THREE.PCFSoftShadowMap に設定しました。
2. カメラ: 影がより良く見えるようにカメラの位置を調整しました。
3. 立方体: マテリアルを THREE.MeshPhongMaterial に変更して光に反応するようにし、castShadow を有効にしました。
4. 光源: 影を落とす THREE.DirectionalLight を追加し、その影のプロパティを設定しました。
5. 平面: 立方体の下に影を受け取る水平な平面を追加しました。ウェブブラウザで index.html ファイルを開くと、照明と影のある立方体を確認できます。 - https://tsaitoh.net/~t-saitoh/jd2025/step1/
- index.html ファイルが照明と影を含むように更新されました。以下の変更を加えました:
マウス操作
- 自動で立体が回転する処理を取り除いて、マウス操作で視点を変更できるようにして。
- index.html を修正し、立体の自動回転を停止した上で、マウス操作(左クリックで回転、右クリックで平行移動、スクロールでズーム)による視点変更を可能にしました。主な変更点は以下の通りです:
1. OrbitControls の導入: THREE.OrbitControls ライブラリを追加し、マウスでの直感的なカメラ操作を可能にしました。
2. 自動回転の削除: animate 関数内にあった cube.rotation.x および y の加算処理を取り除きました。
3. 慣性(Damping)の有効化: 操作に滑らかさを持たせるため、controls.enableDamping = true を設定しています。これで、マウスを使って自由に視点を動かせるようになっています。 - https://tsaitoh.net/~t-saitoh/jd2025/step1-1/
- index.html を修正し、立体の自動回転を停止した上で、マウス操作(左クリックで回転、右クリックで平行移動、スクロールでズーム)による視点変更を可能にしました。主な変更点は以下の通りです:
越前焼のシステム
THREE.js を使ったシステムを簡単に作れることが確認できたので、越前焼の断面の座標をベースに回転体を表示するプログラムを作らせてみる。
- JavaScript の THREE.js を用いて、回転体を表示するプログラムを作りたい。
回転体の断面図の座標は、5点からなり、
X0=(0,0),X1=(4,0),X2=(6,2),X3=(7.5,5),X4=(8,8)とする。X5=(4,-1)として、
X0,X1,X2,X3,X4を直線で結んだ線と、X1,X5を直線で結んだ線で、Y軸を中心とした回転体を表示するプログラムを作成して。 - 自動で立体が回転する処理を取り除いて、マウス操作で視点を変更できるようにして。
- https://tsaitoh.net/~t-saitoh/jd2025/step2-1/
- プロンプトに一度に作りたいものを指導しても、細々としたところで違ったものができる。
X0~X4,X1,X5を結んだ直線と伝えたけど、X0~X5を結ぶ閉曲線で表示されている。- X0~X4を結ぶ直線とX1,X5を結ぶ直線で回転体を表示するように修正を指示。
- 画面を2つに分けて、左側に3次元形状、右側に断面図を表示するようにして。
- 断面図の点X1,X2,X3,X4,X5の座標をマウス操作で変更できるようにして。
- X0,X1,X2,X3,X4の直線をスムージングして。
作りながら、最終的にはこのデータで 3D プリンタで出力させたいとのことで、厚さの変更や、3D形状データのダウンロード機能の追加などを指導する。
この後、指導した生徒さんが、お父さんの指導のもと、こちらから途中で色々なアドバイスも与えて、改良した最終形が以下の作品。
3Dプリンタで出力
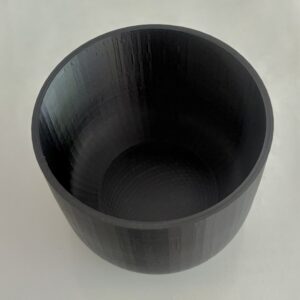
プログラムの作成にあたり与えた座標が X0=(0,0),X1=(4,0),X2=(6,2),X3=(7.5,5),X4=(8,8),X5=(4,-1) だったけど、印刷したらすごく小さく3D印刷された。指の先にのるサイズ。このままだと単位が mm みたい。ということで、実際の印刷時には 7倍サイズに拡大して3D印刷している。
AI利用での様々な制限
ジュニアドクターでの指導にあたりコーディングには Gemini を使ってもらったけど、生徒さんのアカウントでは「13歳未満は Gemini は使えない」という制限があるため、指導に協力してもらったお父さんのアカウントを使いながらの作業となった。
今回、バイブコーディングの説明用に Gemini を使って途中経過のページを改めて作成したけど、Gemini も進化して Gemini3 とかが使えるけど、無課金状態なので「1日当たりの使用制限を越えた」とかで、途中で Gemini 2.5 Flash-lite などに切り替えたが、これでも上限越え。最後のスムージングなどは Microsoft Copilot に切り替えて作成している。Claude Code は、同じ Google アカウントに紐づいているからか、最初から課金してね…って言われたぞ。
Homebridge2 はまだ早い?
homebridge2.0 が正式リリース
Homebridge の最新の homebridge2.0 が正式リリースとなった様子。
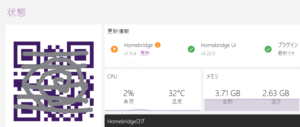
早々に更新をかけたけど、Homebridge People Pro とか Homebridge Cmdswitch2 などのプラグインが対象外となったようで、更新して起動したら、プラグインが動かず、バージョンを元に戻した。
更新してしまうと、自宅サーバでは Homebridge People Pro を活用して、在宅 / 外出の判定に使っていたのが動かなくなる。HomeAssistant に移行すればいいんだけど、私,ママ,こども,洗濯機などの監視だと、オートメーションの設定がかなり煩雑になる。
当面は、Homebridge 1.11.4 のままで運用かな。
letsencryptのCAA関連のトラブル再び(2)
letsencrypt のドメイン名の更新エラー、確認すると以前発生していた IN CAA … のトラブルが再発している。
状況も同じで、再設定。
snap refresh のトラブル
Ubuntu 26.04 をいれて、snap store につながらなくなり、snap refresh が動かない。
この2日間ほど色々と原因を探していたが、原因不明。マニアックな自宅ネットワークの設定不備を疑って悩んでた。でも、ややこしくない根っこのルータに直結して実験してもつながらない。ということは自宅ネットワークのトラブルじゃない…と確信できたんだけど、そのあと数分後に(何もしてないのに)動き出す。なんだかなぁ…
2026/05/03
Ubuntu への DDoS 攻撃が出ているらしい。snap も影響うけてたんだろうな。
spamhaus のDQSキー取得
spamhaus はパブリックDNSを拒否
自宅メールサーバでの運用で、spamassassin などの設定をしていても、迷惑メールがそれなりに届く。
傾向としては、Google や Amazon のクラウドサーバから、SPF や DKIM を正規に取得した使い捨てドメインから送られてくる。このため、OpenDMARC などを設定してもダメ。Gemini に聞いたら、使い捨てドメインからの RBL のデータベースが得意な、spamhaus を薦めてくれる。
ただ、spamhaus は、以前にも設定したけど問い合わせを拒絶されたので、設定から外していた。改めて確認すると spamhaus は、無料サービスだけど大量の問い合わせをさばききれないので、8.8.8.8 や 1.1.1.1 のような パブリックDNS を経由した問い合わせには、答えを返さない運用をしているらしい。私の拒絶経験もコレが原因。
んで、色々調べると、無償サービスだけどユーザ登録して DQS キーを使えば、パブリックDNS経由での問い合わせでも拒否されないらしい。(最初、ユーザ登録とか嫌いなので、パブリックDNSを使わないキャッシュDNSサーバを立てようか…とも思ったけどシステムが複雑になるだけ)
spamhaus のユーザ登録とDQSキー生成
spamhaus の登録ページにアクセス(Spamhaus DQS Sign Up )し、DQS キーの発行を行う。
postfix に登録
postfix の main.cf の smtpd_recipient_restrictions に 以下のように登録。xxx…xxx の部分に発行した DQS キーを記載する。
((( /etc/postfix/main.cf )))
smtpd_recipient_restrictions = permit_mynetworks,
                permit_sasl_authenticated,
                reject_unauth_destination,
                reject_rbl_client xxxxxxxxxxxxxxxxxxxxxxxxxx.zen.dq.spamhaus.net=127.0.0.[2..11],
                check_policy_service unix:private/policy-spf,
                permit
追記 2026-05-07 spamhausの効果覿面
spamhaus を RBD に登録してから、効果覿面。使い捨てドメインからのメールがきれいさっぱり止まっていて、最近は spam なしが続いている。
Ubuntu 26.04 で独自パッケージ設定が無効化
Ubuntu 26.04 をインストールしたら、nodejs, vscode, google-chrome などの インストール用の設定が無効化されている。まあ、競合する可能性あるだろうし、無効化されても文句はいえん。ということで、設定のやり直しをして、古い sources.list を削除
((( node.js )))
$ curl -fsSL https://deb.nodesource.com/setup_24.x | sudo -E bash -
$ sudo apt-get install -y nodejs build-essential

((( vscode )))
$ curl -fsSL https://packages.microsoft.com/keys/microsoft.asc \
  | sudo gpg --dearmor -o /usr/share/keyrings/microsoft.gpg
$ sudo apt install code

((( google-chrome )))
$ wget https://dl.google.com/linux/direct/google-chrome-stable_current_amd64.deb
$ sudo apt install ./google-chrome-stable_current_amd64.deb

((( 古い sources.list を削除 )))
$ cd /etc/apt/sources.list.d/
$ sudo rm *.distUpgrade

((( パッケージ更新の確認 )))
$ sudo apt upgrade -U
UPS交換(Linux 7.0による警告対策)
UPSが大量の警告
Ubuntu 26.04 の導入により Linux の Kernel も linux-image-7.0.0-14-generic になったが、移行後の Load Average が高い。
原因を調べると(後述)、apcupsd で kernel が以下の警告を毎秒くらいの頻度で出ている。APC ES 750 を使っているけど、4byte の返答があるはずなのに2byteしか返ってこないという内容らしい。このため、syslog のファイル出力でシステム負荷が 0.4 ほどに上がっている。
4月 24 23:05:29 ... kernel: hid-generic ...
   :Event data for report 22 was too short (4 vs 2)
以前の Kernel なら、同様のエラーはでていたのかもしれないが、syslog に警告を記録していなかったから、問題にはならなかった。Kernel が 7.0 になり、この辺の対応がきちんとするようになったのが原因のようだ。
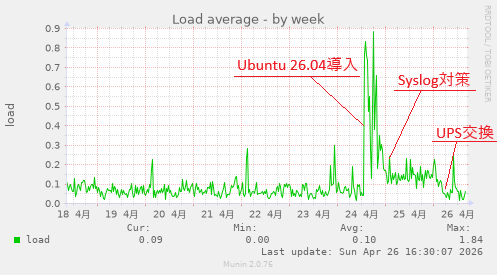
しかたがないので、syslog でこのメッセージを記録しないように設定したけど、それでも 負荷が 0.2 ほどになる。
以前の Kernel なら、0.1 程度だったので、 なんとなくヤな感じ。
負荷の原因の見つけ方
今回、UPS の原因を見つけるにあたり、Gemini を活用しまくり。top の出力を Gemini にかけて、pidstat, vmstat などの結果を確認して…の繰り返し。
$ top
$ htop               # あまり重い処理がみつからない
$ sudo pidstat 2 5   # 2秒おきの集計を5回表示
$ sudo vmstat 1 5    # 負荷の原因が、計算かディスク待ちか
$ sudo iotop -o      # どのプロセスが入出力しているか
                     # ここで、systemd-jounald が原因というのが判明
$ sudo journalctl -f # Syslog を確認
                     # ここで、UPS のログが見つかる
UPSのエラー対策
UPS のエラー警告だけど、UPS の状況を確認すると、apcaccess コマンドの結果が、「ONLINE:つながってるけど NOBATT:バッテリーがつながっていない」との出力がでている。充電電圧も出力されていてバッテリーは動いているはずなのに…。Gemini に聞いても「UPS のよくある故障だし、Syslog を無視するようにして問題なく、他の機能が正しく動いているなら無視していい」とのアドバイス。
$ apcaccess
:
STARTTIME: 2026-04-24 17:54:04 +0900
MODEL    : APC ES 750G
STATUS   : ONLINE NOBATT
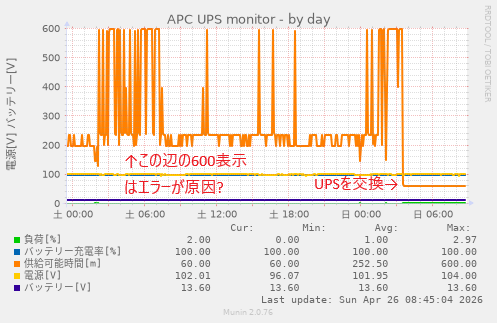
Syslog をフィルタリングしてディスクI/Oが改善しているとはいえ、以前より負荷が高い状態は気持ち悪いので、USPを交換した際の予備(バッテリー交換済み APC ES 550)があったので、元に戻した。
交換したら、UPS の警告は出なくなり、Syslog フィルタリング処理も不要になって、負荷も 0.1 程度に落ち着いたので、これで良し!!
Copilot Keyboard 正式版キー割り当てもOK
Microsoft Copilot Keyboard が正式リリースとな。ベータ版が出た最初に試したときは、macOS のキー操作に慣れていると、無変換、変換キーを IME/off/on に割り当てるのができないとタイピングに影響が大きく、イライラして早々に削除したけど、正式版は問題ないみたい。
Google 検索